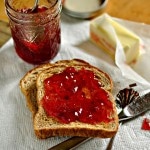
How to make and can Strawberry Jam
This is the full explanation of how to can strawberry jam! Delicious ruby red, county fair winning strawberry jam
Servings: 8 pints
Calories: 708kcal
Cost: $15
Equipment
- measuring spoons and cups
- large bowl
- small sauce pan
- large stock pot
- potato masher
- pie plate
- Mixer
- Ladle
- funnel
- canning magnet
- jar lifter
- water bath canner
Ingredients
- 7 Cups of Granulated Sugar
- 5 Cups of crushed strawberries about 8 cups of whole berries – or about a gallon.
- 4 Tbs lemon juice
- 1 package of regular powdered fruit pectin 1.75 oz/49-57g.
Instructions
- Purchase and/or pick your strawberries. Purchase or locate your jam jars, rings and lids. You will need about a Gallon of strawberries to make a single batch of Jam and each batch yields about 8-10 jam jars. Please only use jars designed for canning. Do not reuse old spaghetti jars, mayonnaise jars, etc. These are not made for canning and could break or not seal properly. Believe me, that would be a MAJOR bummer.
- Wash your jars and make sure they are completely sanitized. Personally, I run them through the dishwasher, and if you time things just right so that you are ready to fill the jars just as the washer is complete – then you don’t have to heat the jars as you will see in a future step! At my house, this means turning the dishwasher on just as I am getting ready to top the strawberries – it could be different at your house.
- Set the large pot you will use as your water bath canner on the stove – filled ½ - ¾ with water. Set heat on high. Place top on the pot and keep an eye on this while you complete the other steps. If it starts to boil, remove lid and turn down temp so that it keeps a small simmer while you work. (This way it will be easy to return to a boil when you are ready to start canning)
- Top your strawberries and cut the little white core out of the strawberries. See how Mark does here? If the strawberry is mostly red all the way through, you can skip the coring part. The core won’t hurt you but it can leave some funny colored bits in your final jam – unappetizing!
- Wash your strawberries and then make sure they are as dry as possible. You can see that we place them on layers of paper towels and then also blot them dry with more paper towels. Be gentle, you don’t want to bruise them or squeeze any delicious juice out!
- You will see in the picture that I am using my kitchenaid to smash the berries. If you do not have a kitchen aid, don’t worry – you don’t need one. For years, I made my jam with a potato masher – and that is all that you really need. Simply place the berries in a glass bottomed pie plate and using a potato masher – mash the berries until they are a consistency that you like for your jam. You can see in the photo the consistency of my berries – mine are more juice than berry when I am done – but there are still pieces of berry floating in there. Smash the berries until you have 5 Cups of smashed berries (this roughly equals 8 cups of berries). Set the berries aside for a moment while you prepare everything else. Add the lemon juice. (Use the store bought lemon juice because it has a consistent acid level – which is needed for the safety of what you are canning. Lemons acid level varies).
- This is a recipe that requires that you get everything out and ready to go before you start cooking. Measure out your sugar (7 cups – which is almost an entire 4lb bag of sugar). Open your Sure-Jell packet and place it where it will not spill. Make sure your jars are ready (hot and clean). If your jars are already clean but need to be heated, you can do this one of several ways. The Ball Book suggests placing the jars in the canner of boiling water and allow to boil until you are ready to use. I have found it easier to set the jars on a large cookie sheet, set the oven on 130 or so and then place the jars in the oven. Your choice. The idea is that you want the jars to be hot when you are ready to ladle the hot lava like jam into the jars so as not to break them with the great temperature differences. Place the lids in a small sauce pan and cover with water – place on the stove and set to medium low. You want the lids to heat but not to boil. Make sure to have all of your canning tools ready to go: Damp Paper towels, Ladle, Timer, Jar lifter, head space tester, bubble remover (same as head space tester if you have the same tools that I have), funnel, slotted spoon and magnet for the lids If you don’t have these items, you can make due with tongs (jar lifter), plastic ruler (head space tester), plastic knife (bubble remover) and tongs (to remove lids from the boiling water). However, I really recommend having these basic items as it makes the job so much easier.
- Canning water is boiling, Jars are clean and heating or hot, jar lids are heating and all of the tools are clean and ready to use. We are ready to cook the jam! Take your 5 cups of smashed berries and whisk in the package of Sure-Jell. Stir, stir stir. Set the stove top on high heat. Stir frequently and cook the berries until they come to a full boil. While boiling, add the sugar all at once. Then stir stir stir – don’t stop until you are certain that all of the sugar has dissolved. (the berry mixture may kind of puff and swell initially when you add the sugar – this is ok and to be expected). Stir frequently until the berry mix comes to a full rolling boil that can not be stirred down. Once they are at the full boil stage – set your timer for one minute and keep stirring/boiling for a full minute.
- After a full minute of boiling, remove the pan from the heat and stop stirring. Allow your jam to rest for a minute or two and you will see that foam rises to the top. Using a slotted spoon, skim off as much foam as you can. (The foam won’t hurt you or affect the taste of the jam – but it does form a hard little white spot on the top of your jam and affects how the jam looks).
- Once the foam is removed, ladle the hot jam into the hot jars using the jar funnel. (Its time to turn your canner back up to full boil as well). Leave ¼ inch of space between the top of the jar and the jam. Add or remove jam to make this correction. Using the plastic knife or the bubble remover, gently poke down to the bottom of each jar several times to remove any bubbles. You will need to check the head space again after removing bubbles and add or remove jam as needed. Wipe the rims of each jar with a damp paper towel to remove any drips of jam. Place the lids on the jars – seal side down on the jar and then place the ring and twist until it is “finger tip tight”. This mean, tight enough so as not to be loose – but loose enough that it doesn’t require any strain to remove the ring. (You want air to be able to escape from the jar after the jar has gone through the canner so that it will create the proper seal).
- Place the jars into your canner, using care so as not to break any. Lower the jars into the hot water and place the lid on the canner. When the water returns to a boil, set your timer for 10 minutes. After 10 minutes, turn off the heat. Remove the jars from the water bath and place onto a clean kitchen towel in a place that is free from a draft. Evenly space the jars, cover with a damp kitchen towel and allow to cool. You will hear the jar lids pop as they finish their seal. The most satisfying sound in the world. Do not disturb the jars for 24 hours. Although it is tempting, do not pick the jars up to check them or to examine them. Wait 24 hours. After 24 hours, label your jars (with labels or write on the jar lid) with the name of the contents, date and year (Strawberry Jam 5/25/2015). Your jam is best if used in the first 6 months. I have used my jam after more than a year in storage and it has been just fine though.
Video
Notes
- You will want to use the freshest and best strawberries that you can find.
- Fresh ripe berries have red all the way through and very little white core.
- Once strawberries are actually ripe, you need to use them within one to two days.
- Avoid strawberries that have a large white core, that don't smell fresh or are significantly bruised.
- Cut off any areas that are bruised or bad.
Nutrition
Calories: 708kcal | Carbohydrates: 183g | Protein: 1g | Fat: 1g | Saturated Fat: 1g | Sodium: 3mg | Potassium: 145mg | Fiber: 2g | Sugar: 179g | Vitamin A: 11IU | Vitamin C: 56mg | Calcium: 16mg | Iron: 1mg